Thursday, April 1, 2010

Quilling

Quilling is the art of creating delicate shapes from strips of paper. Coiled into letters, flowers, and other forms, the stylized paper transforms an ordinary card into a keepsake.

Quilling, or paper filigree, is the art of creating intricate shapes from strips of paper. The technique is simple: After a long, narrow ribbon of paper is rolled around a needlelike tool, the strip is slipped off, arranged with your fingertips into the desired shape, and then glued to a background of contrasting paper, fabric, or wood.

Quilled motifs such as flowers and hearts express sweet sentiments for Valentine's Day and Mother's Day, but they also add an elegant touch to cards for any occasion.

In this tutorial, we'll show you how to make the shapes necessary to create several types of quilled cards.

Step 1


•5/8-inch multicolor quilling paper (No. 356), $

5 for 100 pieces, from Lake City Crafts, quilling.com


•1/8-inch quilling paper in color of choice, $1.45 for 50 pieces, from Lake City Crafts, quilling.com (You can also use medium-weight paper, such as vellum or stationery)

•8 1/2-inch paper trimmer, $24.99, from Martha Stewart Crafts available at Michaels (You will need this if you are making your own quilling strips.)

•Round-headed pin

•Slotted quilling tool (No. 171), $3.75, from Lake City Crafts, quilling.com

•Fine-pointed tweezers (No. 177), $3.75, from Lake City Crafts, quilling.com

•Small sharp scissors, by Martha Stewart Crafts, available at Michaels stores

Martha Stewart Crafts tools and supplies are available at Michaels, Walmart, AC Moore, Meijer, and independent craft stores.

Gather Materials


Don't let the elaborate effects fool you; quilling is simple. You need only a few basic crafts items.

Clockwise from top:

A round-headed pin is useful for precise glue application.

A slotted quilling tool lets you create coiled shapes with ease.

Fine-pointed tweezers are essential for tiny shapes.

Use small sharp scissors to cut fringe.

Quilling paper comes in a variety of colors and widths; most of our projects can be made with standard precut strips. If you prefer, use a paper cutter and medium-weight paper, such as vellum or stationery, to make your own; construction paper is too heavy and will not roll easily.

Step 2: Basic Quilling Shapes


Experiment with basic techniques before starting a project.

Loose Circle

Create a tight circle, but do not glue. Instead, lay it on a flat surface, and let it expand. When satisfied with the shape and size, glue the end of the strip to secure.

Loose Scroll

Form a loose circle, but do not glue closed.

Marquise

Fashion and glue a loose circle; pinch each end.

Connected Scrolls

Make several loose scrolls; position with unrolled ends pointing the same way. Curve each over rolled end of next scroll; glue.

Open Heart

Fold a strip in half, and crease. Roll each end toward center.

V Scroll

Crease paper at center; roll ends outward.

S Scroll

Form an S shape by rolling one end toward center, and the other in the opposite direction.

C Scroll

Roll both ends of a strip toward the center


Step 3 : Open Hearts

Open heart shapes are used in the quilled heart valentine. To make open hearts, fold a strip in half, and crease. Roll each end toward center and glue to card.


Step 4 : Tight Circle

Tight circles are one of the most basic quilled shapes, and are used to make the quilled frame cards.

To make a tight circle, slip paper into the slot on the quilling tool, placing paper's end flush with edge of slot.

Step 5 :Complete the Tight Circle

To complete the tight circle, turn tool until strip is rolled into a firm cylinder. Remove paper from tool, and glue closed to complete your tight circle.

Step 6 : Teardrop

Another common shape is the teardrop, which is also used in the quilled frame cards. To make a teardrop, create and glue a loose circle; pinch one end to form a point.


Step 7 : Frame

If you want to design a frame or border for your card, create a freehand pattern that incorporates several of the basic shapes you've learned. Alternatively, you can purchase a published pattern, many of which are available in clip-art books.

Here, we arranged a series of fleurs-de-lis, each made from three V scrolls of graduated sizes, and one teardrop. Form and glue individual shapes, using the pattern as a guide. Then use a ruler to draw a rectangle on the card. Dab points of glue on undersides of quilled shapes and position them, standing on edge, along the pencil line. Hold in place for 15 seconds to allow glue to set.


Step 8 : Fringed Flower

Fringed flower shapes are used in the quilled floral cards. To make a fringed flower such as a daisy or a zinnia, scallop the top of a strip of paper, and then cut fringe. (To create flowers with centers, glue together two strips of paper, each a different width and color, end to end; then fringe.) Roll entire length of paper into a tight circle, as shown here.


Step 9 : Complete the Fringed Flower

Glue closed. With your fingers, spread the fringe and separate it into petals. Curl the petal ends outward and downward with tweezers to achieve desired shape.


Step 10 : Bells

Bells are used to make the quilled lily-of-the-valley card. Roll and glue a tight circle. Using your finger, push center of circle to create a cone. Secure the end with glue. If desired, spread a light layer of glue over surface of bell; this will help the bell keep its shape. Or spread glue inside to hide the glued area. Positioned along four leafy stems made from strips of green paper to complete the lily-of-the-valley.


Step 11 :Script

Quilled script is used to make the scripted valentines. You can write a message in your own hand, adapt one from a calligraphy book, or create one on a computer. Lay short strips of quilling paper along the curves of each letter you want to form. Shape ends with quilling tool, or use scissors to curl paper as you would a ribbon; cut strips to correct length. Trace message onto paper. Glue at intervals, one letter at a time. Turn quilling paper on edge; use tweezers to hold it in place for 15 seconds to allow glue to set.


Classic valentine messages never go out of style. You can shape individual strips of paper, curling the ends as you would a ribbon, to form letters that resemble calligraphy. Use carefully placed dabs of craft glue to hold each letter in place on a card.

Quilled Florals

To make these elaborate quilled floral cards, create a trio of fringed flowers, such as daisies or zinnias, and glue them to folded card stock. Use an opaque pen to add a message in your own script.


For a lily-of-the-valley card, roll eight off-white bells, and position them along four leafy stems made from strips of green paper


You can write a message in your own hand, adapt one from a calligraphy book, or create one on a computer. Lay short strips of quilling paper along the curves of each letter you want to form. Shape ends with quilling tool, or use scissors to curl paper as you would a ribbon; cut strips to correct length. Trace message onto paper. Glue at intervals, one letter at a time. Turn quilling paper on edge; use tweezers to hold it in place for 15 seconds to allow glue to set.

http://www.marthastewart.com/article/quilled-floral-cards

Potato-Stamped Cards


With a few good-size potatoes and assorted miniature cookie cutters, you and your kids can make personalized cards for any occasion.

With a few good-size potatoes and assorted miniature cookie cutters, you and your kids can make personalized wrapping paper, cards, T-shirts, place mats, and napkins. Choose large potatoes that, when halved widthwise, have a surface wide enough to accommodate a cookie cutter. Place the cookie cutter on a table, cutting side up. Center the potato over the cutter and tap, pressing the cutter at least 1/2 inch into the potato. Using a sharp kitchen knife, cut the excess potato flesh away from the cookie cutter, making slices perpendicular to the cutter; this is a job only for adults. Once the excess potato is removed, pull out the cookie cutter.

To form the center of a flower or another design, hollow out with a melon baller. Potatoes bleed, so wipe each surface dry with a towel before inking and stamping. Make sure to use the proper ink; if you're working on paper, both pigment- and dye-based inks will work, while fabric requires dye-based ink. For paper designs, place a piece of felt beneath the piece of paper to cushion the surface; this will result in a crisp, even print.

http://www.marthastewart.com/article/potato-stamping?backto=true&backtourl=/photogallery/birthday-and-everyday-cards#slide_18

Peekaboo Gift Card


http://www.marthastewart.com/photogallery/birthday-and-everyday-cards

Stamped Wrapping Paper


It's easy to create elaborate designs on wrapping paper using a rubber stamp and an ink pad.

Enclose gifts for your wedding party, or favors for your guests, in handmade wrapping paper covered in impressions made with a square rubber stamp.

But don't save this project for the last minute, when wedding preparations will be filling your every spare moment; paper can be prepared in advance.

For a uniform pattern, stamp a large sheet of paper repeatedly with the same stamp, leaving a small space between each impression.

Or stamp just the center of a piece of wrapping paper. If your box and stamp are the same size, you can just stamp the top. If the box is larger than the stamp, the pattern can trail down the sides.

A stamp rolling pin also makes an attractive pattern. We applied several different colors to a sheet of white paper to create a muted design. Store stamped pages flat.

http://www.marthastewartweddings.com/article/using-rubber-stamps-wrapping-paper?backto=true

Pencil Stamps


Instead of using your pencil eraser to make marks disappear, turn it into a stamp and make playful pictures appear on cards and wrapping paper.


Just press the eraser into an ink pad, and stamp polka dots onto paper. Or cut the eraser with a utility knife to create different looks: Half an eraser makes a half-moon, and a third creates a delicate crescent. We stamped colored kraft paper and blank card stock, and added stems to flowers with a green pencil.


http://www.marthastewart.com/portal/site/mslo/menuitem.0e0eb51a2e6b5ad593598e10d373a0a0/?vgnextoid=e9b2d0f19132f010VgnVCM1000003d370a0aRCRD&vgnextfmt=default&backto=true

Hand-Stamped Stationery


Design invitations and cards for any occasion using basic, store-bought cards.

Tools and Materials


Grass, butterfly, and flower rubber stamps

Ink pads in assorted colors

Blank thank-you notes, cards or notepads


Stationery How-To

Place stationery on a large piece of scrap paper. Stamp grass motif across base of stationery, overlapping imprints if necessary. Add flower and butterfly accents. To create envelope seals, stamp rows of perforated stamp paper. Punch out designs, and adhere to envelope with glue stick.

http://www.marthastewart.com/article/hand-stamped-stationary?backto=true&backtourl=/photogallery/all-occasion-cards#slide_13

Floral-Cutout Cards & Wraps


Add a new dimension to gift wrap and cards with these floral cutouts.

Download the template and cut it out.

Using a pencil, trace the template onto the desired surface.

Carefully cut along traced lines with a craft knife, leaving gaps between petals.

For gifts, wrap item with paper in a contrasting color before covering with cutout layer.

For cards, attach a cutout card to a second card in a contrasting color using double-sided tape.

http://www.marthastewart.com/goodthings/floral-cutout-wrap-and-cards?backto=true&backtourl=/photogallery/all-occasion-cards#slide_12

Poetic Wrappings

Even the ribbon and paper on a valentine present can say, "I love you." Romantic poetry -- try Byron, Keats, or Shelley -- will provide words appropriate to your amorous circumstance.


Poetic Wrappings How-To

In your best script, copy a line onto 1/4-inchwide quilling paper. Or use double-faced satin ribbon, and decorate it with a short, traditional phrase, such as "Be Mine"; a stamp with adjustable letters, available from most stationers, makes the message look like that on a tiny candy heart. An old typewriter also gives a present a romantic feeling; transcribe a verse onto tinted vellum for wrapping.

If you're giving chocolates, count the ways sweetly on small paper disks, and place one beneath each candy.

http://www.marthastewart.com/portal/site/mslo/menuitem.0e0eb51a2e6b5ad593598e10d373a0a0/?vgnextoid=f379ab3d3a3b4110VgnVCM1000003d370a0aRCRD&vgnextfmt=default&backto=true

Button Stamp


Button Stamp How-To


1. Select buttons with raised surfaces and distinct patterns -- fluted edges, stars, flowers, cat's eyes, and pinwheels. With white craft glue, mount buttons on wine or craft corks; if possible, use a cork narrower than the button so you can see to position the stamp accurately. Buy already inked stamp pads in several colors from your stationer. Uncoated papers are most receptive to the ink. Since buttons are rigid, you'll get the best image by laying paper over a piece of felt or a stack of folded paper towels before stamping. Press button into pad, then stamp, rocking it gently; this ensures a complete edge.


2. Wipe the stamp clean on a damp sponge between impressions. Try layering some of the simpler images for enhanced effect.

http://www.marthastewart.com/portal/site/mslo/menuitem.0e0eb51a2e6b5ad593598e10d373a0a0/?vgnextoid=afdf82149f915110VgnVCM1000003d370a0aRCRD&vgnextfmt=default

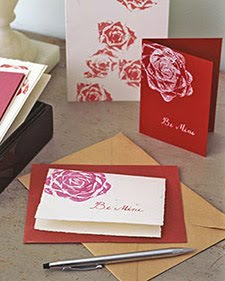
Rosy Stationery


Leafy vegetables make great-tasting salads -- and sumptuous floral-shaped stamps, too.

Here, the end of a head of Treviso radicchio yields a roselike print.


Cut off stem end with a sharp knife, and stand stem on a paper towel, cut-side down, for 5 minutes to dry. Press cut side onto a large stamp pad, then onto cards, stationery, and more, blotting on paper towel between presses.

Vary stamp shapes with other vegetables, such as romaine lettuce stems or even brussels sprouts cut in half.

http://www.marthastewart.com/portal/site/mslo/menuitem.3a0656639de62ad593598e10d373a0a0/?vgnextoid=33a0ce908332f010VgnVCM1000003d370a0aRCRD&vgnextfmt=default&backto=true

Mechanical Dog Cards


If you're looking for a one-of-a-kind greeting card, try these mechanical dog cards with clever moving parts that are sure to charm the recipient.


Tools and Materials

Templates: Top of card ("Hap-pee Birthday," head shaking, or blank), middle (mechanical) pieces, bottom of card

Assembly guide

Printer

Cardstock

Photo of dog (optional)

Scissors

Craft knife

Paste

Ruler

Bone folder

Screw punch

Double-sided tape

Paper fasteners

Regular (one-sided) tape

Dog Cards How-To

1. Print templates for each of the 3 layers of the card -- top of card, middle (mechanics), and bottom -- and assembly instructions on card stock. To make a card featuring your own dog, print out the blank template and cut out and paste a photo of your dog that's about the same size and pose.

2. Starting with the bottom of the card, use a ruler and a bone folder to score along the dotted lines. Cut out the full piece on the solid lines. Punch the hole marked by a black dot with a screw punch. Fold up along the dotted lines along both edges.

3. Cut out the middle (mechanical) pieces on solid black lines. Score on dotted lines where marked. Punch holes where marked with a screw punch.

4. Attach folded pink "stop" piece to bottom of card with double-sided tape, as shown in the template.

5. Use paper fasteners to attach the moving pieces to each other. Insert paper fasteners from back to front so "wings" open onto front of tabs.

•Attach the yellow tab arm to the pull tab at point "A."

•Attach the green tab arm to the yellow tab arm at point "B."

•Attach the green tab arm to the bottom card piece at point "C."

6. Fold up the pair of leg/head "flanges" along dotted lines.

7. Cut out the top piece for the card, and cut out circle as marked. Lay the assembled bottom piece flat, fold the two long flaps in over the pull tab, and put double-sided tape along the two long flaps.

8. Lay the top edge of the front of the card over the tape on the top flap of the bottom of the card; press in place. Pull the leg/head flanges through the hole in the front of the card.

9. Attach the bottom edge of the front of card to the bottom flap.

10. Place a piece of tape on the back of each of the leg/head flanges so that sticky side extends past the flanges, facing up. With the pull tab pushed in, position the leg/head over the flanges (leg should cover the word "peee"). Press down firmly so the tape holds leg/head in place. Cut off excess tape with a craft knife.

11. Attach stand to back of card with double-sided tape.

Resources

Paper fasteners are available at office-supply stores. All other tools and materials are available from Martha Stewart Crafts. Special thanks to popular children's book author, Matthew Van Fleet, for sharing this craft. For more information about Matthew, visit dragonflys.com. Special thanks to Simon and Schuster for giving copies of Matthew's book, "Alphabet," to our studio audience.

http://www.marthastewart.com/article/mechanical-dog-cards?backto=true&backtourl=/photogallery/all-occasion-cards#slide_7

Potato Prints


Potatoes are wonderful mashed, baked, scalloped, or fried, but they have a less conventional use, too: as decorative stamps for personalized gift cards and tags.

The best potato prints have a painterly quality reminiscent of impressionist art. To make one, cut a potato (any variety will do) in half, and draw a shape onto the flesh with a pencil.

Then, using a utility knife or a jackknife with a thin blade, carve around the outline of the pencil design, and cut away the background to a depth of 1/4 inch.


Mix gouache paints (available in tubes at art-supply stores) with a little water, then apply the paint directly onto the design with a brush; or dip the potato into a dish of paint as though using a stamp pad.

Press the potato onto blank cards, reapplying paint when the prints become faint. Each print will look unique and slightly irregular -- a work of art in itself.

To make a tag, punch a small hole in the corner of the card with a needle or an awl, and thread a piece of string or ribbon through.

http://www.marthastewart.com/good-things/potato-prints?backto=true&backtourl=/photogallery/all-occasion-cards#slide_11

Message Cards

It's easy to express yourself with our fill-in-the-blank stationery. And you'll never have to make a last-minute dash to the store again. Choose from one of three patterns, then adhere a pretty calligraphed message to the front (we supply 10). No matter the occasion, you're guaranteed to have something sweet to say.


Message Card How-To

Heavy matte ink-jet paper yields the richest colors, but any card stock will do.

Download and print card template and cut out. Use a bone folder and a ruler to create a crease; fold. Download and print greetings onto clear matte self-adhesive label paper. Cut out greeting and adhere to card.

http://www.marthastewart.com/article/message-cards?backto=true&backtourl=/photogallery/all-occasion-cards#slide_8

Wednesday, March 31, 2010

Pressed Pansy Cards


http://www.marthastewart.com/photogallery/birthday-and-everyday-cards#slide_13

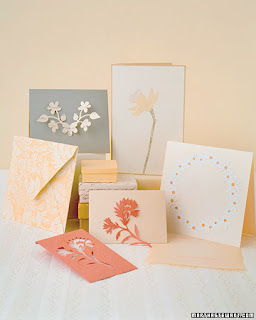
Paper Cutout Cards


These beautifully rendered floral cutouts look elaborate but are easy to make.

•Paper of your choice, from Martha Stewart Crafts


•Sharp pair of embroidery or cuticle scissors

•Pencil

•Utility knife with replacement blades

•Transfer paper

•Bone folder, from Martha Stewart Crafts

•White craft glue (or spray adhesive), from Martha Stewart Crafts

•Glue stick (if using heavier paper), from Martha Stewart Crafts

•Fine-tipped brush

•Self-healing cutting mat

•Flower templates
 
Introduction
 
These beautifully rendered paper cutouts require only patience, concentration, and a careful hand to make. The materials required for even the most elaborate cutouts are simple and inexpensive -- paper and pencil, scissors and knife.


We used two main cutting techniques to produce our designs. One is to cut a single shape, often drawn along one continuous line, from unfolded paper (like a silhouette); the other method is to cut one or more designs from folded paper, resulting in double images or repeating patterns.


Step 1 : Trace the Templates

To start, use transfer paper to trace the templates, which will keep the design right-facing. For cutting designs from folding paper, do not fold the paper more than two or three times. Score creases with a bone folder for precision. Before you begin to cut, secure the edges of the folds with paper clips, or staple the folds together outside the borders of the design.


Step 2 : Cut the Shapes

Paper is easiest to handle if you begin cutting from the center and work your way out to the edges. Pierce the paper with scissor tips or a pin to gain entry into small spaces. A utility knife is ideal for cutting curved shapes, and central and small areas. Rest paper on a self-healing cutting mat, and apply steady downward pressure on the blade. Guide the knife toward you, holding the paper taut with your free hand. Scissors are best for large shapes and outer edges.


Step 3 : Attach the Cutout

Once you have begun to cut on a fold, never open the paper to check your progress; it is nearly impossible to realign it, and the symmetry of your design will be spoiled. To eliminate the chance of a tear, you'll need to change knife blades whenever the paper starts to pull as you try to cut.

Before pasting a cutout onto paper or another surface, you may flatten it in a heavy book for a couple of days or press it with a cool, dry iron. Mark and measure carefully for placement; even freshly glued cut work cannot be moved without risk of tearing and distortion. Use white craft glue and a fine-tipped brush, or spray adhesive with good ventilation. A glue stick can work for pieces cut from heavier papers.

http://www.marthastewart.com/how-to/how-to-make-paper-cutout-cards?backto=true&backtourl=/photogallery/birthday-and-everyday-cards#slide_0

Elegant Eggs

Inspired by an easy Japanese technique, we've created these delightful decorations to enjoy this Easter and next.


Preparing the Shells

You can empty the contents of a raw egg without damaging the shell. (If you prefer, use wooden eggs, available at crafts stores.) Carefully twist the point of a utility knife against each end of the egg to create two small holes. Insert a long pin through a hole to pierce the yolk. Blow out the insides with an egg blower, available at crafts stores, or with a rubber ear-and-nose syringe. Let drain; rinse. Blow out again, rinse again, and let dry.

Tools and Materials

Blown-out eggs

Pencil

Origami paper

Embroidery scissors

Small paintbrush

Glue sealant, such as Mod Podge

Elegant Eggs How-To

1. Mark egg's length plus 1/4 inch on paper; roll paper around egg's circumference, add 1/8 inch, and mark. Cut out resulting rectangle.


http://www.marthastewart.com/article/elegant-eggs?backto=true&backtourl=/photogallery/easter-eggs#slide_10

Crepe-Paper Spring Birds, Nest & Eggs


Quince branches set the stage for a scene adopted from the newly invigorated outdoors: birds perched beside nests. This flock watches over quail eggs that have been dyed different colors.
Some of the materials can be found at crafts stores and florist shops; others might come from your yard.

1. Make head and body: Use a glue gun to affix a small polystyrene ball to the rounded end of a larger polystyrene egg (for each bird, vary placement slightly to create different body postures); let dry.


2. Cut a 7-inch square of colored crepe paper. Lay the body near the bottom edge. Beginning at the breast, wrap the body, stretching the paper to fit the contours as you go. Brush with tacky glue.


3. Taper back end to create tail. Twist front end to create a beak; brush with glue. Trim with scissors while paper is wet; let dry. Wrap beak in brown floral tape; trim. For eyes, press in map tacks.


4. Make wings: Tear strips of crepe paper in desired hues. Overlap strips to create a color gradient, and glue. Cut out 2 rectangles; glue to each side of the bird. Taper ends to form wing shapes.

5. For the breast, cut a paper oval in a contrasting color, and glue
 
Coconut-Fiber or Grapevine Nest
 
Sources: Loose grapevine, from B&J Florist Supply, 212-564-6086
 
This nest is a cluster of grapevines, shaped by hand and then set onto a quince branch. The eggs are naturally speckled but have been dyed shades of green and blue.


1. Gather coconut fibers or grapevines to form a ponytail; secure 1 end with 24-gauge brown wire.

2. Curl secured end to form a coiled base; continue to curl, adding new bundles and wiring every few inches until nest is formed. (Ours are 2 to 4 inches across.) Secure end with more wire. Adjust by hand to create a cup for eggs.


Dyed and Speckled Eggs


1. Stick flathead pins into a foam board to create a drying rack. In a heatproof jar, mix 1 tablespoon vinegar, about 5 drops of food coloring, and 1 cup hot water. Place eggs (they can be hard cooked or blown out) in dye for 1 to 5 minutes, depending on desired color intensity. Transfer eggs with tongs to rack; let dry about 30 minutes.
 
 
2. Put a piece of felt into a cardboard box. Dip a stiff-bristle paintbrush in watered-down acrylic paint; spatter over felt. To transfer, gently press egg against paint; let dry. Repeat to add more speckles.
 
http://www.marthastewart.com/article/crepe-paper-birds-how-to

Marbleized Easter Eggs


Nestle each of your marbleized eggs in its own bed of grass. Using cardboard dividers, create 12 compartments in a shallow box or an empty shirt carton, then fashion a snug nest of dried grass inside each square. Save the lid for storage.

Tool & Material:

•Egg blower, Aunt Marge's 2-hole Egg Blower, surmastore.com


•12 eggs

•Several mixing bowls, shallow and deep

•Measuring spoons

•Liquid measuring cup

•White vinegar

•Food coloring, including liquid brown food color, lorannoils.com

•Spoon and fork

•Olive oil

•Paper towels


Step 1


With an egg blower, pierce the top and bottom of each egg, puncturing the yolk; carefully expel the contents. Rinse, and let dry.

Step 2

In a small mixing bowl, combine 3 cups warm water, 2 tablespoons vinegar, and a few drops of food coloring. Place egg in dye, and leave it submerged until it turns the desired shade.


Step 3


In a wide, shallow bowl, prepare a second batch of dye -- which will provide the swirls -- in a darker shade or a different color. Liquid should be 1/2 inch deep. Add 1 tablespoon olive oil. Run a fork through this mixture, creating curlicues of oil on the surface.

Step 4


As oil swirls, place dyed egg in mixture, and roll it once around the bowl to pick up oil streaks; remove the egg.


Step 5


Gently pat egg with a paper towel.


Step 6


Let it dry. You can experiment with color combinations: Vary the base tints and the swirls to achieve striking contrasts, subtle shadings, or multihued richness

http://www.marthastewart.com/how-to/marbelized-eggs?comments_page=1&&lpgview=thumb&showComments=true&#slide_0


Crepe Paper Easter Creations


Beautiful and durable, crepe paper lends itself to countless applications. In fact, a strip of crepe paper conforms perfectly to an egg's shape. Glue bands of it to a bunch of eggs, affix tiny crepe blooms, and pile them in a bowl for a simple, elegant display. You also can use the paper to create lifelike flowers with egg centers. Or add crepe ears to an egg and watch it turn into a bunny.


Even leftover egg cartons can become winsome baskets trimmed with pleated crepe skirts. Start with plain or dyed blown-out eggs, and then choose from the sweet embellishments provided here. Soon you and your kids will be turning out colorful crafts by the dozen.


Chubby Bunnies How-To


These adorable table decorations can double as place cards; write names on one side of each egg with a marker.

1. Using template as a guide, cut 2 ears (in direction of grain) from a folded sheet of crepe paper. Fold back base of each ear, apply glue to underside, and adhere to egg. Draw eyes with a paint pen. To make a nose: Glue a pom-pom over one of the holes used to blow out the egg. To make a tail: Glue a larger pom-pom over the other hole.

2. Arrange a fringed strip of crepe paper "grass" in a mini muffin-cup liner; place bunny in liner.

http://www.marthastewart.com/article/crepe-paper-creations?backto=true&backtourl=/photogallery/easter-eggs#slide_18

Easter Eggs Dyed With Onion Skins


Materials Needed


Here is what you need to make these kind of Easter eggs: - eggs - onion skins (pieces as large as possible) - 20 cm (8 inch) squares of cloth - rubber bands - a pot of boiling water - some vegetable oil I start saving onion skins for a month or two before Easter... I guess that's pretty much all of Lent. If you don't have enough onion skins saved up by Easter,…


step 2Wet Everything

Soak your onion skins in a big bowl of water. (I just used a small bowl since I made a single egg for this demonstration.) Be careful with your onion skins. When they are dry, they are pretty fragile and you want to keep them as large as possible. Just dip the squares of cloth in the water, then wring them out so they are damp. Also dip the eggs in the water; it he…


step 3Wrap The Eggs With Onion Skins

Wrap onion skins around each egg. If you are lucky, you'll have skins from the top or the bottom of an onion. These naturally conform to the shape of the egg. If not, just make sure you cover the entire surface of each egg with pieces of onion skin. The water should help the skins cling to the eggs.


step 4Wrap In Cloth

Place an onion skin wrapped egg in the middle of one of your squares of cloth. Wrap the cloth snugly around the egg so the onion skin presses tightly against it. Securely tie off the top of the cloth with a rubber band.


step 5Hard Boil

Carefully add each bundled-up egg to a pot of boiling water. Boil them for seven minutes or so, until they are hard boiled. If you happen to crack one of the eggs when you are putting them in, add some salt to the water; that'll supposedly keep the whites from leaking out of the crack.


step 6Rinse In Cold Water

Once your eggs have boiled long enough, carefully pour off the boiling water and run some cold water into the pot to cool the eggs down.


step 7Unwrap The Eggs

Carefully remove the rubber bands and take the eggs out of the cloths. Peel off the onion skins (you can toss the used onion skins into your compost). Voila The shells of the eggs will now be covered with beautiful patterns transferred from the onion skins in shades of brown, yellow, and green.


step 8Give The Eggs Some Shine

Wipe the eggs dry. Put a little vegetable oil (I used canola oil) on a cloth or paper towel and rub onto the eggs. The oil gives the eggs a nice shine and seals their pores which should help them fresh longer.


step 9The Finished Eggs

There you have it. Use your Easter eggs as decorations for a few days, then crack, peel, & eat 'em. (Ever since I was a little kid, I always crack my hard boiled eggs against my forehead!) When you peel the eggs, you'll notice that some of the colour has bled through the
 
http://www.instructables.com/id/Easter-Eggs-Dyed-With-Onion-Skins_1/

Cracked Egg Dessert


What appear to be cracked eggs are something better, or at least sweeter -- scoops of mango sorbet in chocolate shells.


How-To

Use a sharp paring knife to split hollow chocolate eggs, available at specialty-food stores, in half, using the seam as a guide. Use a melon baller to scoop sorbet into each shell. Serve immediately, or freeze up to 2 hours.

http://www.marthastewart.com/portal/site/mslo/menuitem.0e0eb51a2e6b5ad593598e10d373a0a0/?vgnextoid=d5fb6d63a1ea7110VgnVCM1000003d370a0aRCRD&vgnextfmt=default&backto=true&backtourl=%2Fphotogallery%2Fspring-treats